
Note from Admin: Here’s another excellent guest post written by Marco Sobrevinas! He previously wrote an in depth review of the Filson Magnum Harvey Messenger bag, and now he shares with us how he uses the superb Fuji XF 10-24mm F4 R OIS lens for his professional architectural work. Enjoy, and visit his site, Eyebeam Images!
FUJI XF 10-24MM f4: Shooting Architecture
Fuji’s X series lens lineup (including Zeiss’s three X mount lenses) is one of the primary reasons the system has been so well received by both professionals and informed enthusiasts. Even their first-generation line-up of primes performs very well, especially with all of the firmware updates.
Like Patrick, I’ve been a decades-long, Leica M user (almost 30 years) and have a penchant for primes rather than zooms. Working professionally for 26 of those years, however, meant that I used my fair share of zooms as well. So while I have a sentimental attachment to the rangefinder film camera and prime lenses, when I’m working for pay, I won’t hesitate to use any tool (digital, zooms, post-processing software) to improve my efficiency and the quality of the images I’m providing to a client.
My full-time occupation is a fashion photo producer for the nation’s biggest brand. All of our photographers use big DSLR’s with zooms. The quality is more than sufficient, and the zoom eliminates the time it takes to move the camera back and forth (or up and down) in a studio setting.
When I have time, I also shoot architecture for real estate investors and property owners. An ultra-wide zoom saves a lot of time when working in a tight, indoor location (e.g. condominiums). What follows here is NOT a review of the Fuji 10-24mm, but rather how I use it specifically for shooting houses and properties.
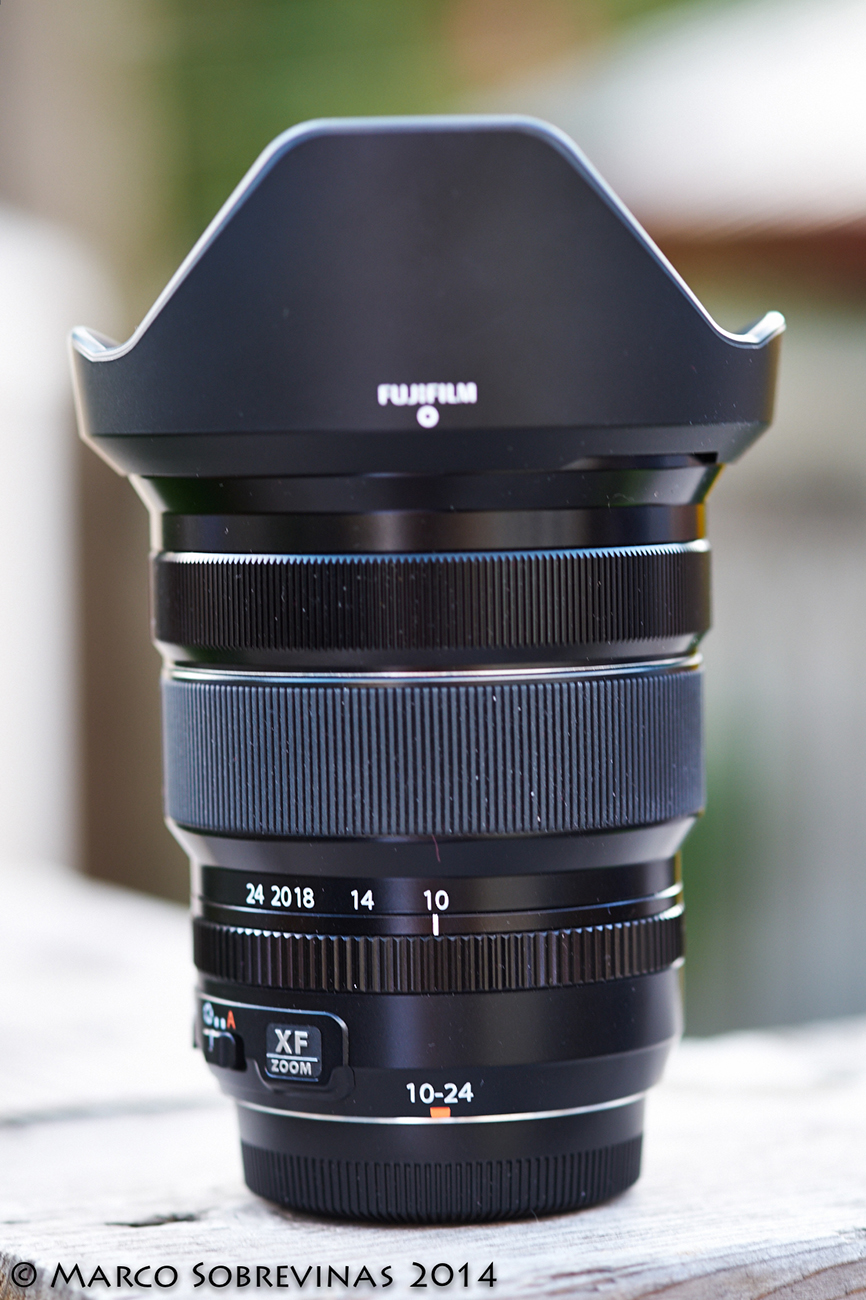
↑ Fuji’s 10-24mm f4 Wide Angle Zoom Lens
People like Patrick at findingrange.com can provide detailed reviews of lenses much better than I can. As a working pro for over a quarter century, I tend to be somewhat basic in my approach to purchasing equipment and have never bothered with pixel peeping. My process for purchasing photographic tools is as follows –
- What do I need in order to photograph the subject matter that I’m getting paid to shoot?
- Which respected manufacturer makes the appropriate equipment that I need? I limit my choice only to those brands.
- I scour the Internet for rational, informed, balanced reviews of those likely candidates. As I said, I’m not an expert at analyzing and testing the optical quality of lenses – but someone like Patrick of findingrange.com is. They do the hard work of testing this gear, so it’s wise to listen to their opinions. With that said, I’ll buy gear that may not be fashionable on the web, but still fulfills my requirements. As an example, the Fujinon XF 18mm doesn’t receive a lot of rave reviews. But it’s the focal length plus size/weight that I wanted for a street-shooting lens. So I bought it anyway, and after using it, I’m satisfied with the results – so I kept it.
- What is a good balance between great quality and paying off the capital expenditure of that equipment? I go for great gear, but I’m not going to gut myself financially just to have the most expensive stuff. When I get paid for photography, I treat it as a business, so I tend to gravitate towards value when it comes to capital expenditures.
- The last question I ask is, which respected retailer has a good return policy, just in case the equipment is defective or isn’t appropriate for my goals?
Once I answer the above questions to my satisfaction, I make my choice and generally don’t worry too much about the optical or build quality minutia, especially when Fuji, Canon, Nikon, Zeiss or Leica makes equipment. Their gear is excellent and more than sufficient for what I’ve encountered as a working photographer. In the two and a half decades I’ve been working professionally, I’ve never once heard a paying client claim a shot one of my photographers or myself is insufficiently sharp. Pretty much most quality gear today is more than good enough for my professional use.
HOW I USE THE XF 10-24MM
Unlike my hobby of street photography, where I love little primes like Fuji’s XF 18mm or Leica’s pre-ASPH Canadian 35mm Summicron, bulk and weight are irrelevant for shooting buildings. Everyone on the property knows I’m shooting there, so I’m not trying to be discrete. Therefore, the size of the 10-24mm is of no consequence. And since I always use a tripod for this type of work, weight isn’t an issue either.
When Fuji released the 10-24mm f4 this past spring for its X system, it was THE lens I needed to use my X-Pro1 to fulfill most of my real estate and property photography. Previous to acquiring this lens, I needed to use a Canon DSLR in order to access an ultra-wide zoom. Since I bought the 10-24mm, I’ve never gone back to the Canon FF DSLR’s.
First of all, the general build and feel of the 10-24mm is superb. It really reminds me of the Canon L lenses we use at work, but lighter and smaller than a similar zoom range for a pro-quality Canon L. The lens is bulkier and heavier when compared to the small Fuji XF primes, but it’s not huge by any means. That said, I feel it’s too large and noticeable for street work, if one is attempting to be discrete.
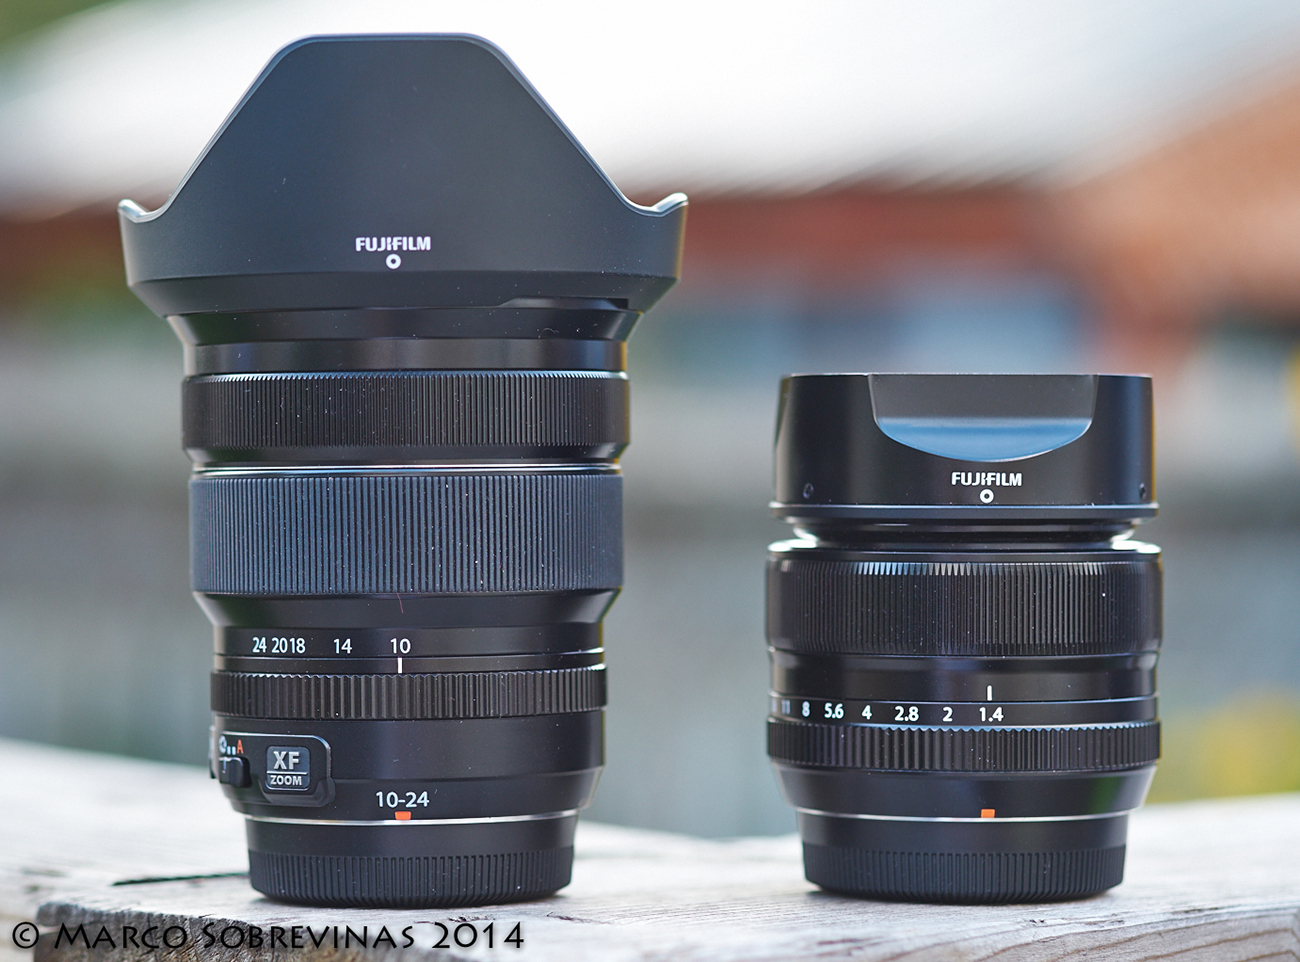
↑ Most Fuji X users are familiar with the 35mm f1.4 lens. The 10-24mm is considerably larger, but still smaller than a comparable FF DSLR zoom
The dampening on both the zoom and manual focus rings is pleasant to use.
There’s an aperture control ring too, that has a nice balance between moving smoothly and sufficiently distinct detents at each stop. At first, I was a bit disappointed that it didn’t have the f stop markings, unlike my Fuji XF prime lenses. In practice, I got used to reading the f-stop in the finder or rear screen after only a day of shooting, so the lack of f-stop markings is no longer an issue for me.
There’s a big plastic hood that’s provided. I’m a photographer who ALWAYS uses a hood with lens, and almost never a protective filter. Besides the obvious optical advantages for using a hood without a filter, in most cases, I’ve found a hood provides sufficient physical protection for the front element. On rare occasions, like shooting near salt water, in a snow storm or in a dusty environment, I will use a protective filter.
The 10-24mm’s hood is quite good. It doesn’t add too much weight, and provides decent protection against oblique, stray light, preventing flare. In a couple cases since I purchased this lens last spring, I’ve had some flare hot spots occur if a bright light source or large specular highlight is in the scene itself. I suppose that’s inevitable, with such as massive front element.

↑ Large hood & Large front element
The optical quality is superb for my purposes. I concur with the glowing reviews of many lens testers out there. The majority of my real estate work is posted online, but many property owners and real estate agents still use print. For either use, the 10-24mm is optically fantastic.
I almost always shoot with the lens at its optimum aperture of f8. Especially at the ultra-wide end of the zoom range, the depth of field is incredibly deep, which is usually desirable for real estate shooting. I like not having to go smaller than f11 most of the time, so that completely avoids the issue of loss of sharpness due to diffraction.
The 10-24mm’s full frame equivalent is roughly 15mm to 35mm. Indoors for small properties such as condos or bungalows, I tend to use the wider end of that range. Even at 10mm, I find this lens rectilinear, and distortion free optically. I assume that’s due to excellent optics combined with distortion correction in the firmware or the processing software. As with any ultra-wide, one still has to be cautious of distortion due to perspective, with objects towards the edge of the frame.
When utilizing any extreme wide-angle lens such as the 10-24mm, I have to be careful to keep the camera level. Since I only use this lens on a tripod when I’m shooting buildings or interiors, that’s never an issue.
My tripod of choice is a very modestly priced Manfrotto 055XPROB. It’s sufficiently rigid to hold the lightweight Fuji X-Pro1 with the 10-24mm mounted on it. The quick release levers at each section of the legs are fantastic to use on location. Much faster than threaded twist locks. Perhaps the latter are more secure, but I’ve never found the quick release levers on Manfrotto tripods to be an issue. Tightening them is easy, with its included tool.
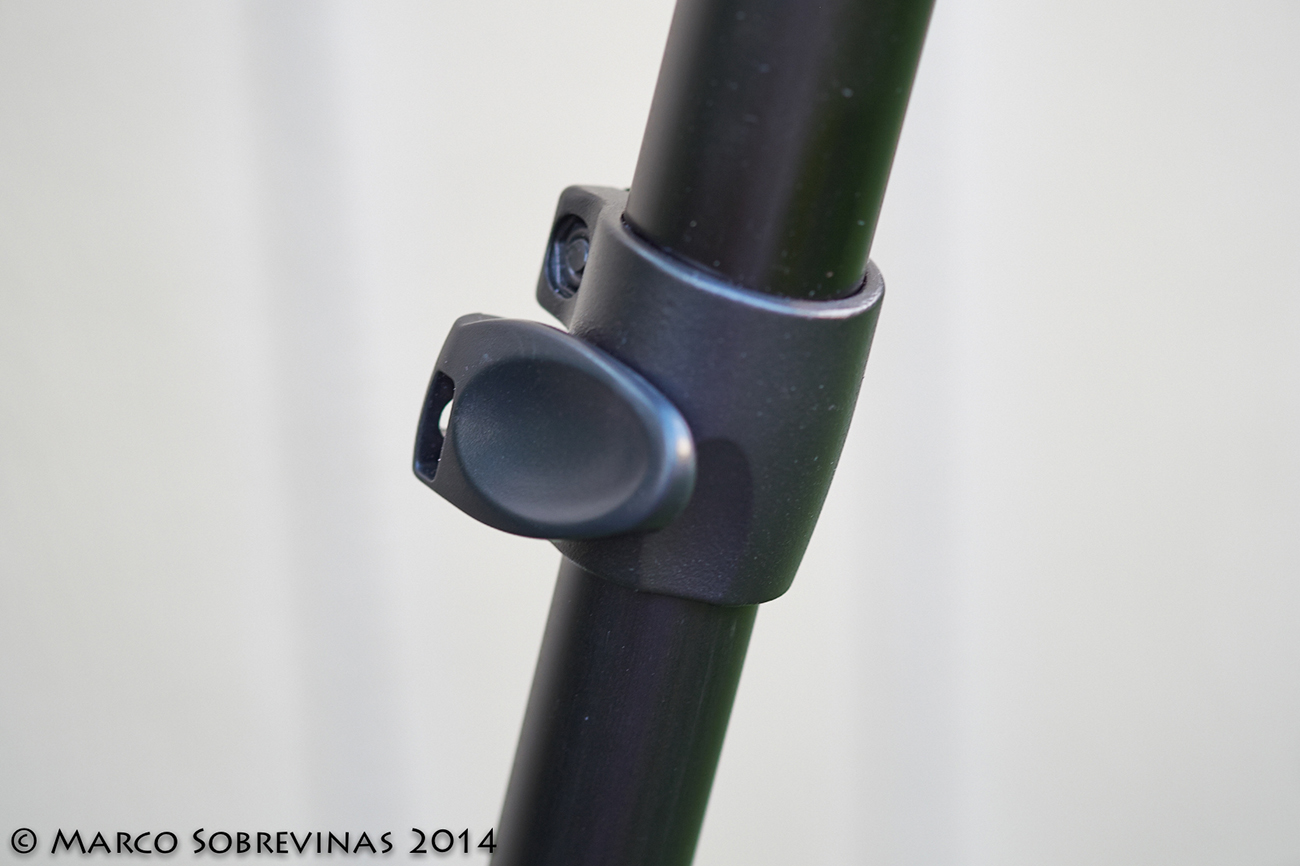
↑ Quick release levers for the Manfrotto’s tripod legs
The Manfrotto head I use is the 804RC2. Unlike most fashionable tripod heads, it’s NOT a monoball. Instead, it’s an old school, pan-tilt head, with separate controls for rotation, pitch and yaw. My first job after graduating from college was assisting an architectural photographer for two years. That shooter taught me the importance of being able to isolate the above three movements so that the camera can be perfectly level.
Further aiding in squaring the camera, is that both the Manfrotto’s tripod as well as its tripod head have bubble levels. For architecture, I depend on these constantly, to level the camera.
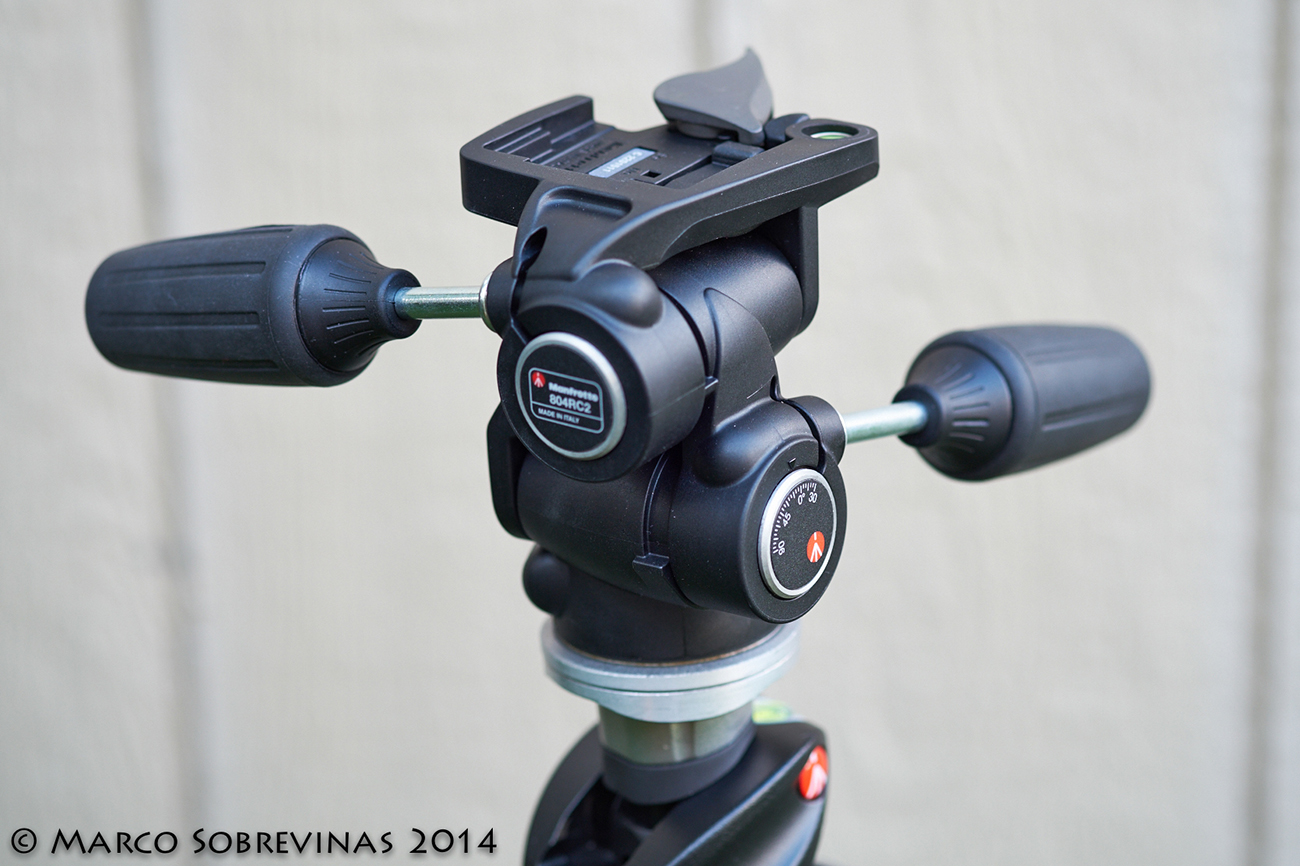
↑ Manfrotto’s Pan-Tilt-Swivel head with bubble level
The final aid to achieving a perfect level, is the Fuji X-Pro1’s digital horizon. That’s my final check to achieve a perfectly level camera, after I ensure the camera has been leveled on the tripod and its head.
↑ Level is carefully checked when shooting real estate & architectural subjects
Also, the tripod opens the door for me on long exposures. As mentioned, I always try to use f8 where this lens is at its optimum and to get sufficient depth of field. I also like to use the Fuji’s base ISO of 200, for maximum image quality and lack of noise. I don’t want to resort to using higher ISO’s, just for the sake of a faster shutter speed.
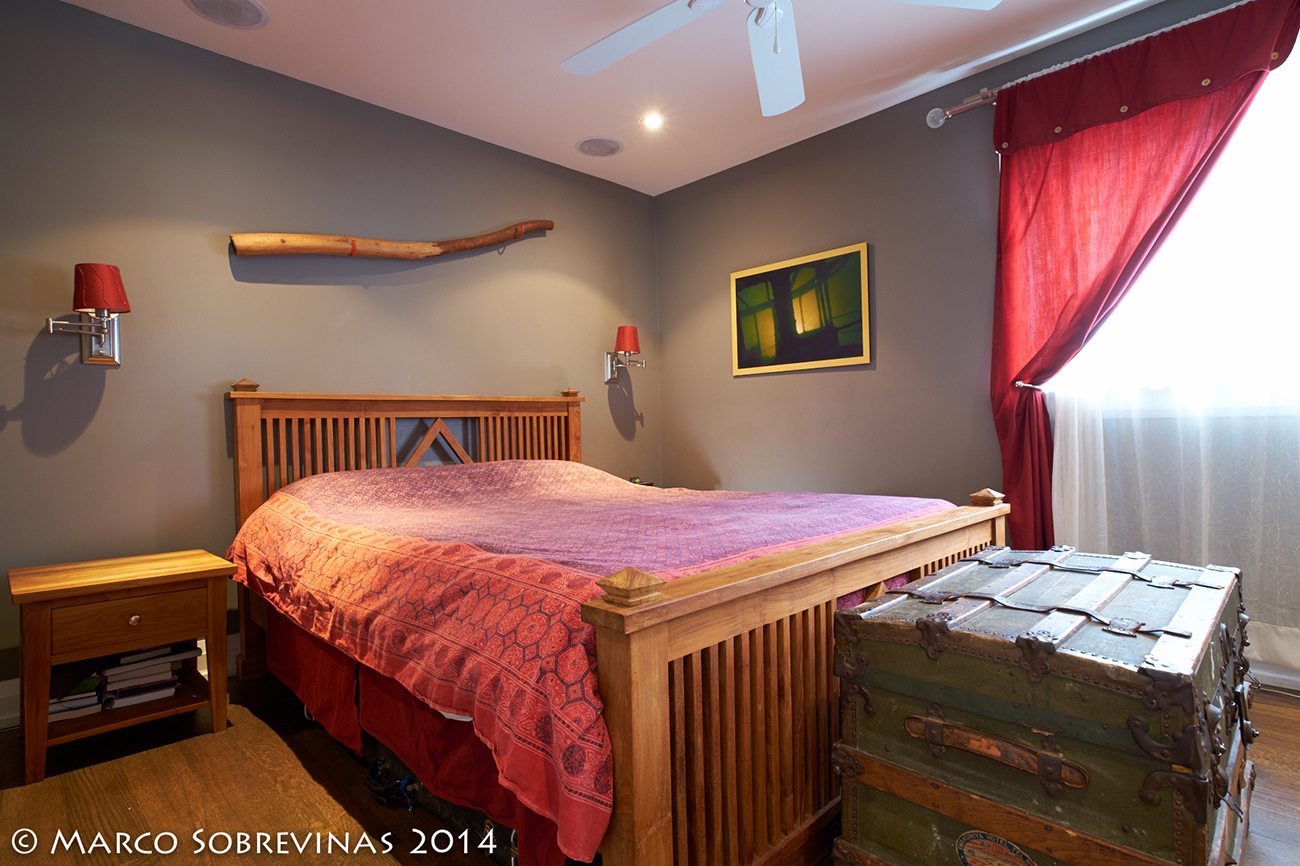
Shooting indoors at f8 and the camera set to ISO 200 inevitably leads to longer exposures than can be kept stable, hand-held. So the tripod is a must, for maximum quality. Interior shots in the accompanying photos range from a few seconds to almost half a minute.
An inordinate amount of writing spent discussing the tripod rather than the 10-24mm lens? For shooting architecture, not at all. I feel that the tripod is the single most important tool for shooting that subject matter.
Such long exposures opens up another possibility – multiple hits of strobe light with a single flash. In many of the interiors, the images are supplemented with at least one flash going off. In some cases, the exposure was long enough, and the scene benefited from the two areas receiving fill flash, so that was done.
I use a cheap and used Vivitar 285 (bought it for $60) on manual settings, sometimes with a diffuser, sometimes without. I either place it in the scene, hidden behind an architectural feature or furniture, or I might be walking behind the camera, adding a hit or two of fill flash where it’s needed.
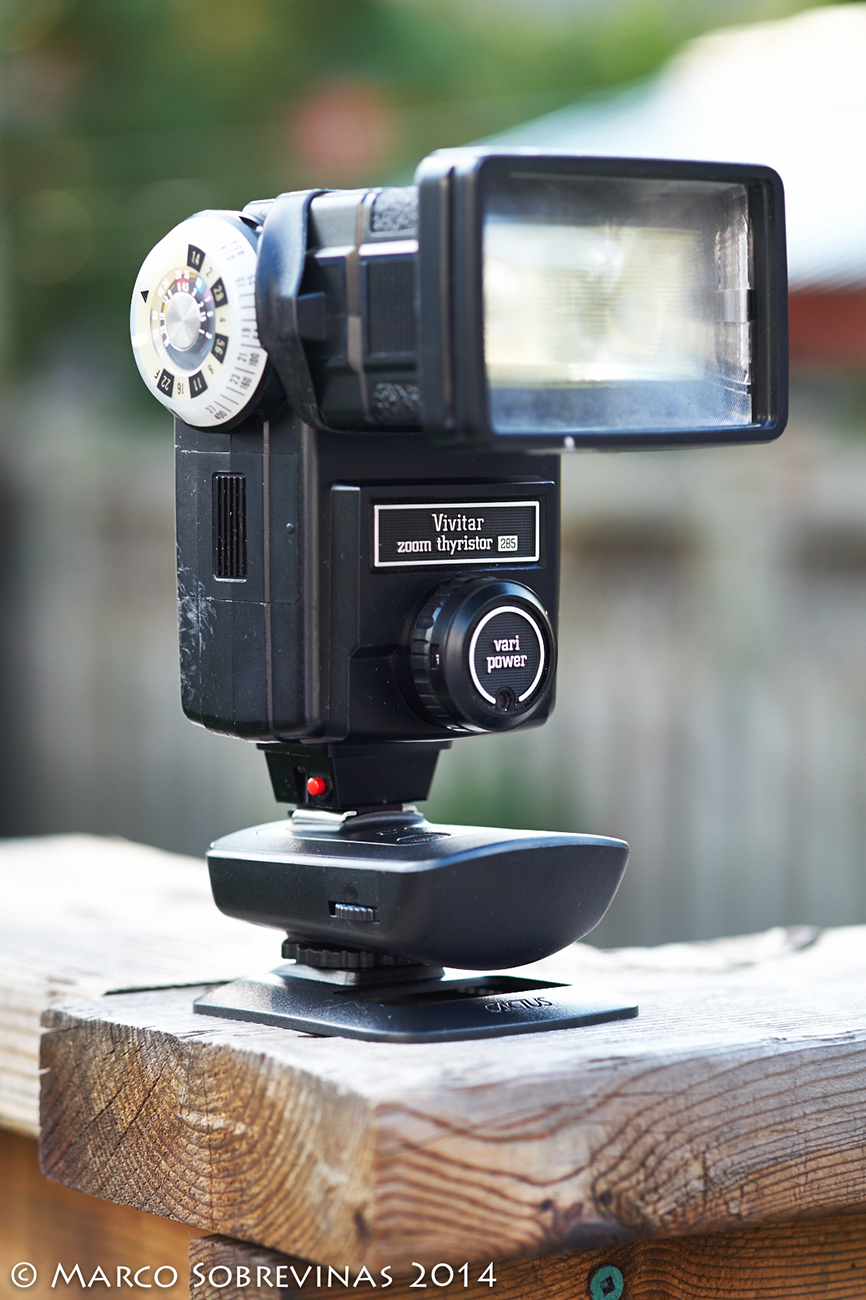
↑ Used, inexpensive old school Vivitar 285 that can be manually adjusted. Mounted on a low cost but effective radio slave
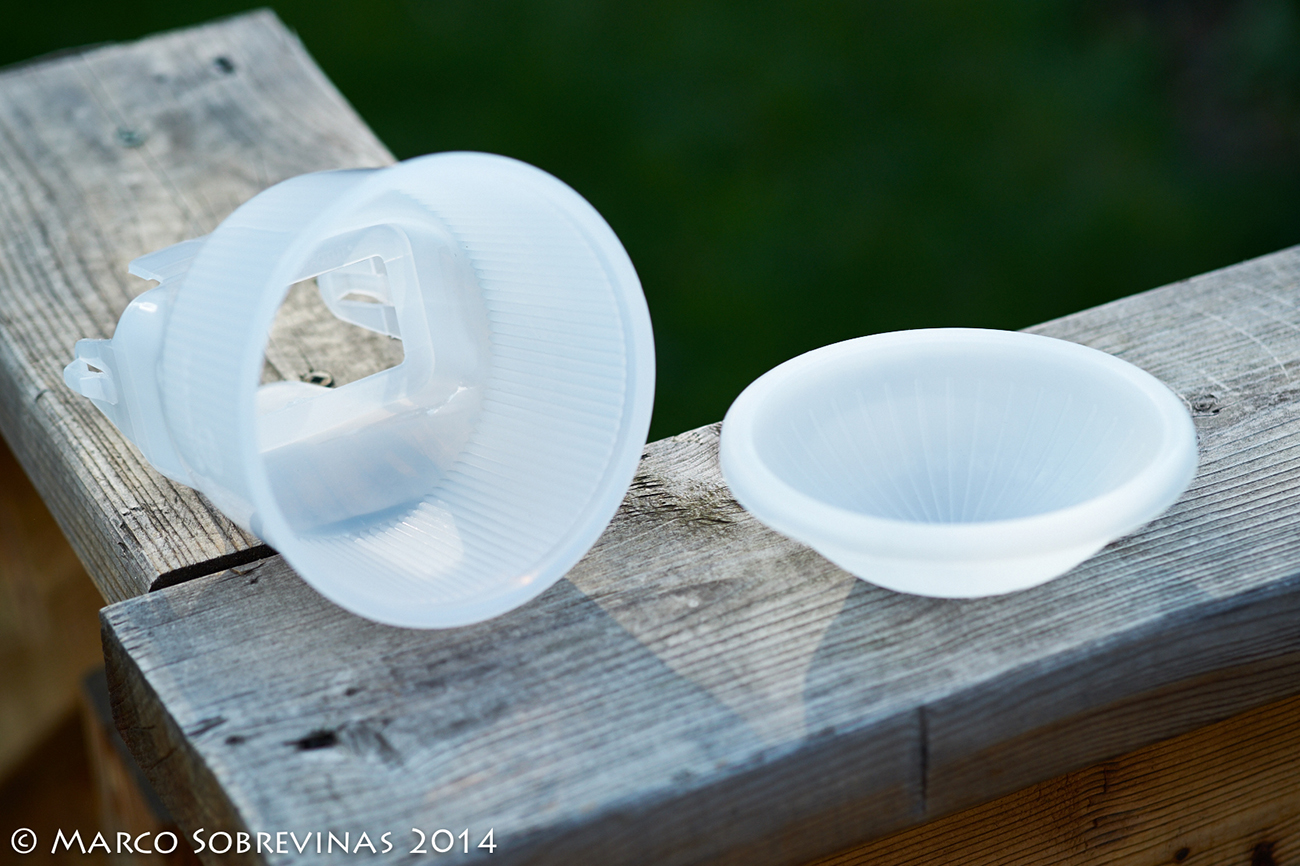
↑ Inexpensive light diffuser used on the strobe when required
Adding light to where it’s required makes the initial capture look better, without having to severely alter the dynamic range during postproduction in Capture One. Nothing wrong at all in playing with the shadows and highlights on a Raw file in Capture One – it’s part of the process. But if I can capture it optically, I try to do so when possible.
↑ Existing light plus a touch of strobe hidden in the scene
I’ve used the 10-24mm casually for shooting family and friends. If it’s near the 10mm mark, the subject is physically close and the camera isn’t perfectly level, there are some wild effects due to the extreme perspective. That can be fun for casual shooting, but it’s not acceptable for real estate photography.
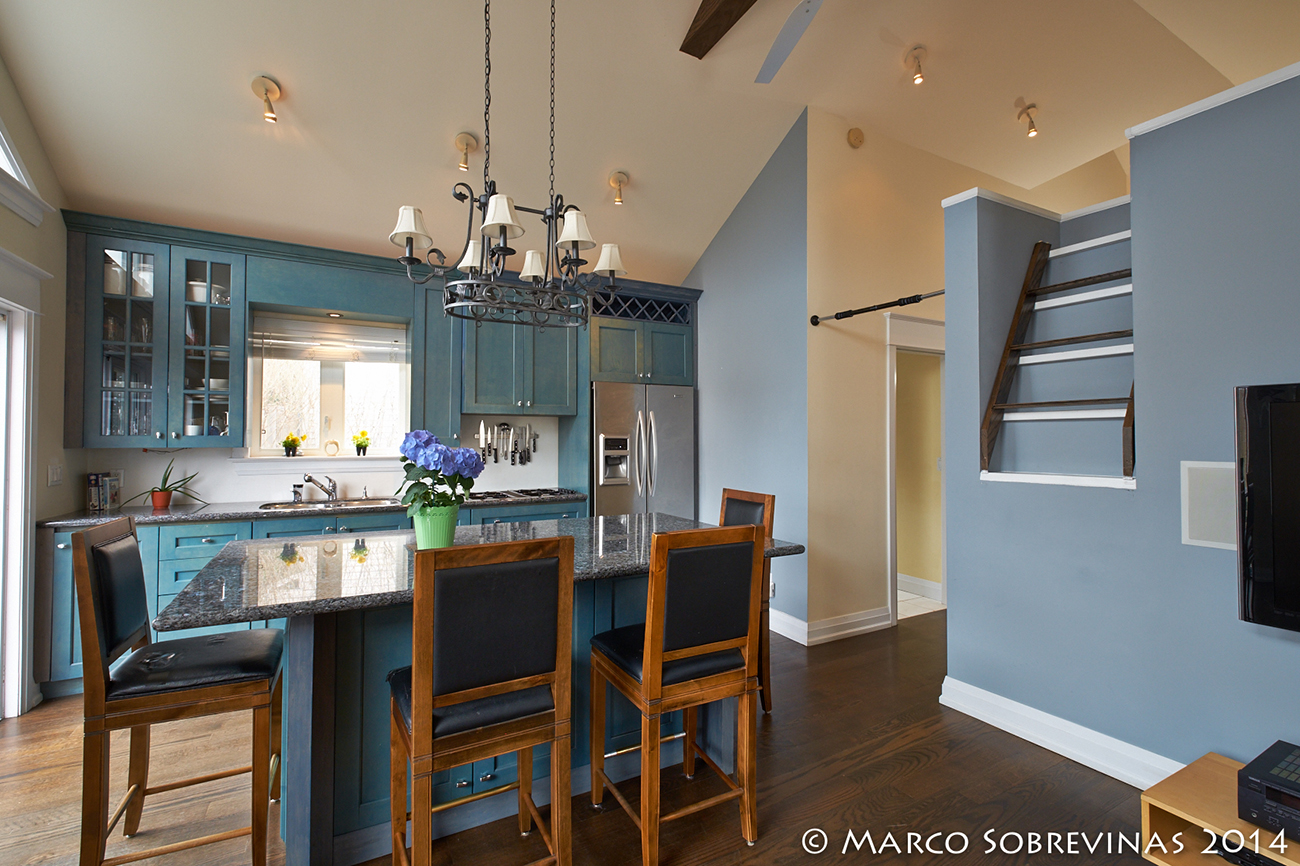
With the examples shown, most of them are shot closer to the 10mm rather than the 24mm end of the zoom. As you can see, having the lens perfectly level really reduces that feeling of an extreme wide-angle being used.
Interestingly, for the interiors of small to mid-size homes that I’ve been shooting since I acquired this lens a few months ago, the ugly specter of converging lines hasn’t been an issue. For most shots when it comes to architecture or real estate, converging lines which results in the home or room looking like it’s “falling backwards” is a big faux pas, and is to be avoided.
The exception to this is angles where the camera is obviously looking up or down. If you look at the photos of the living room, which is shot from the loft area looking down, I didn’t bother to correct the converging lines. With the camera pointing down at an extreme angle, the convergence looks natural and isn’t disturbing to the eye.
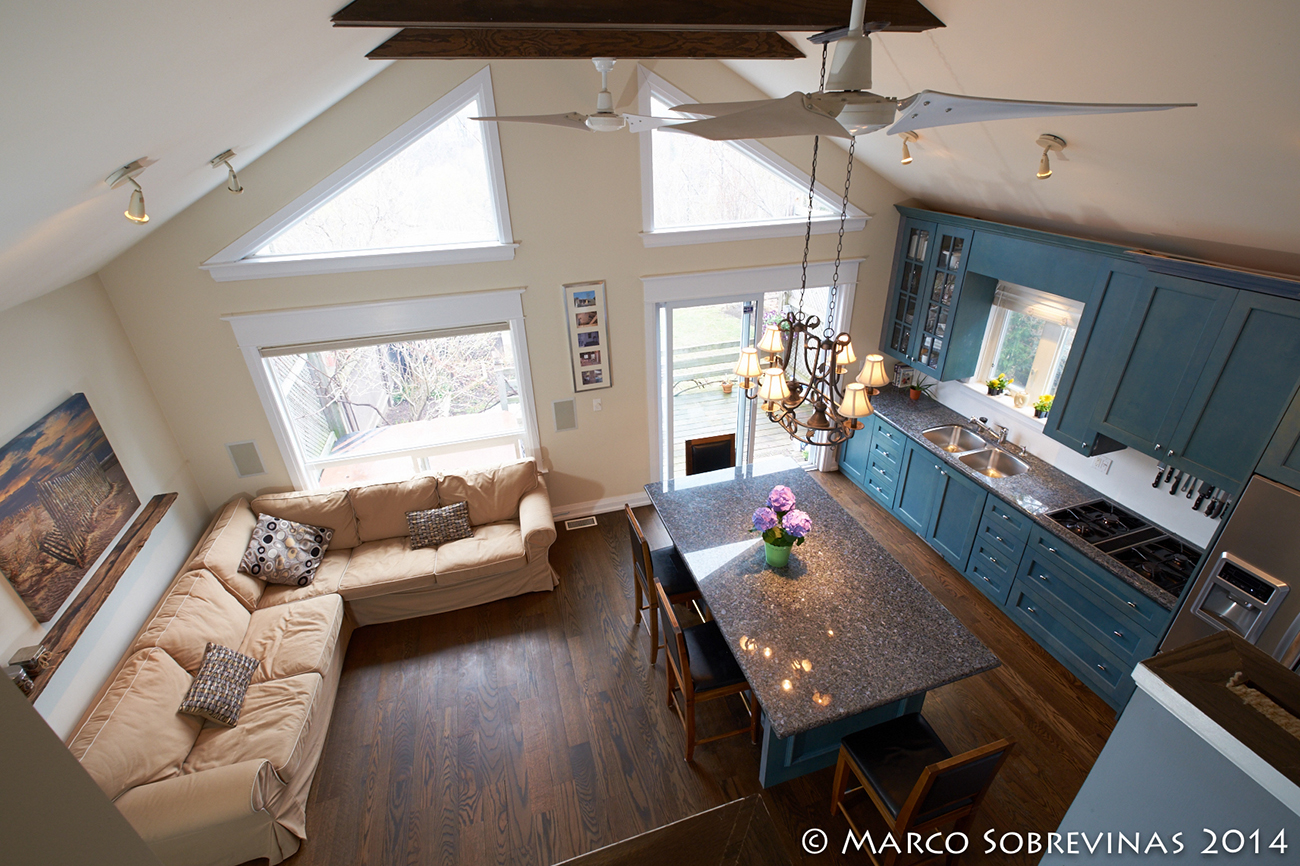
↑ Shot from the loft: an obvious downward angle. No need to correct converging lines here
Once I have the camera perfectly level, given the height of interior ceilings, I then adjust my tripod’s center column vertically, to include as much or as little of the ceiling or floor, as required by the shot. The camera remains level (this is where using the level on the tripod as a starting point, and not just the tripod head, becomes important), so there’s no convergence.

↑ Keeping vertical lines straight for this image
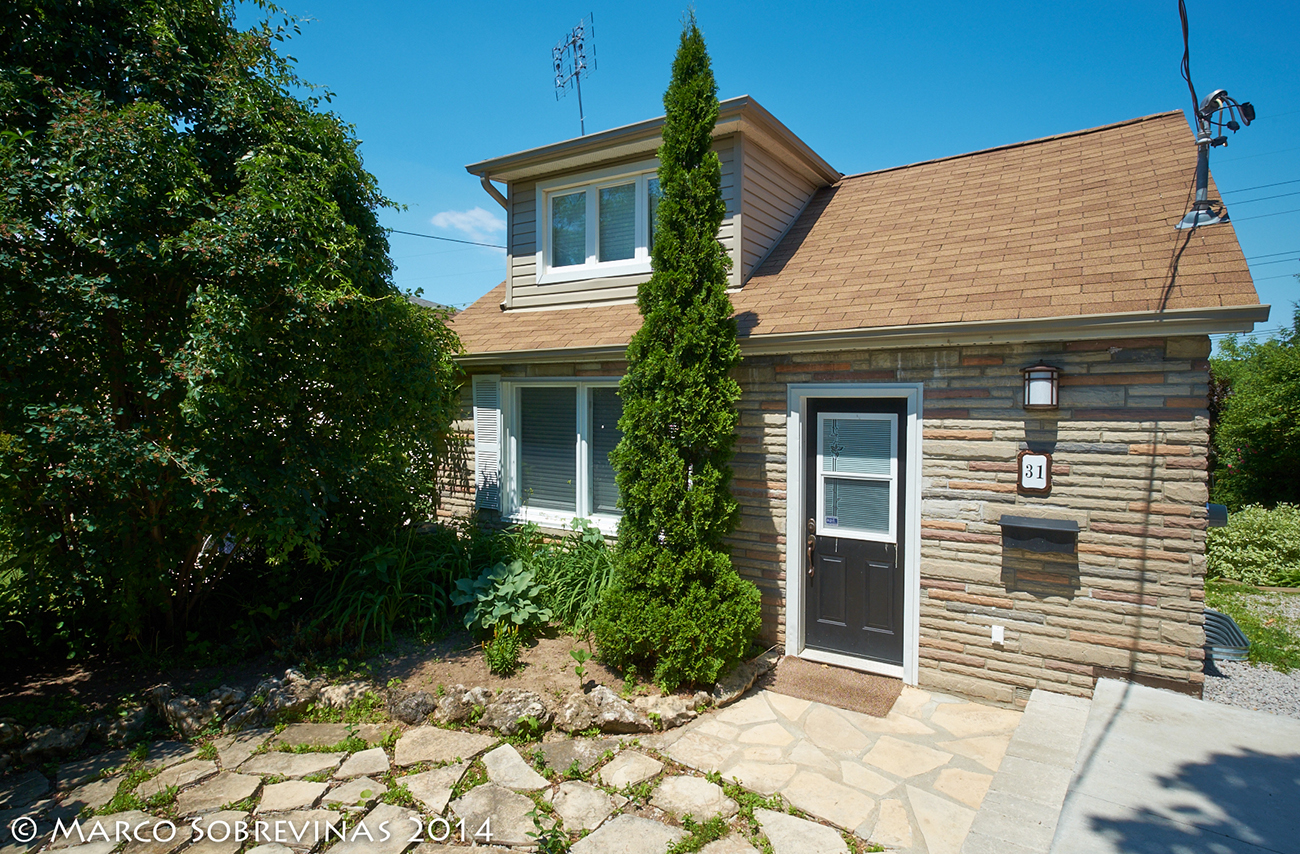
For exteriors, even with a small house such as a bungalow, heights are much greater due to the roof. For the exterior shots of the home in my sample pictures, I had to either resort to –
- Using the 10-24mm and tilting the camera upwards on the tripod to include the roof. I then have to correct convergence in Capture One with its convergence correction tool. The one disadvantage with this solution, besides the minor addition of post-processing time, is that I lose image area, reducing the angle of view. So I have to shoot wider than I would if I wasn’t going to do post-convergence correction.
- The alternative: I use a perspective-correcting lens in order to capture parallel lens in-camera. Many Fuji X users know immediately that there is no PC or TS lens in Fuji’s current lens line-up. So I resort to a Frankenstein set-up: a Kipon Shift Adapter with a 17mm (25mm-e) lens. In most cases, I have sufficient shift travel to allow me to photograph a building without having to execute digital correction after the fact. So there’s no loss of image area, nor time required in post.
I’ll discuss the Kipon Shift Adapter with a wide lens another time, as it’s beyond the scope of this article.
While I do like to capture photographic images in-camera as much as possible and attempt to keep post-process digital manipulation to a minimum, I’m absolutely not against digital correction either. It’s a great option for problem-solving photographic challenges. For that work, I’ve used Capture One for many years, as it’s the main capture and processing program that most of my professional colleagues and I use.
↑ Vertical lines straightened with Capture One’s Keystone correction tool
As a street shooter, I use my Fuji X-Pro1 like my old Leica M cameras – with its OVF. For architectural photography, it’s obviously EVF the entire time. As I zoom wider from 24mm, past 17mm or so, I don’t have a choice with the OVF. Anything wider than that is beyond the optical finder’s angle of view. So I have to switch to the EVF anyway.
Framing has to be precisely aligned for architectural work, which is another good reason to use the EVF. Parallax is completely eliminated.
A more subtle reason for using the EVF is that it’s like viewing with an SLR – I’m looking through the lens, rather than a separate, glass viewfinder. As a pro, I’m meeting a client’s expectations for pay. In a sense, I’m really a photo illustrator, fulfilling the requirements of the job.
I find “illustrating” for an outside purpose (i.e. a client); it’s easier to design the picture when I’m seeing through the lens, whether it’s a traditional SLR or a mirrorless like the Fuji X. So I use the EVF the whole time I’m using this lens for work purposes.
Since this past spring, Fuji’s 10-24mm has become my essential lens, along with a PC lens setup. The 10-24mm covers everything from extreme wide (15mm-e) to normal wide (35mm-e). Other than the infrequent detail shot, I don’t use anything longer for architecture and real estate work.
Note from Admin: It’s always great to see how these wonderful lenses from Fuji are being used in different areas of photography, and I would like to thank Marco for sharing with us his professional use of the Fuji XF 10-24mm F4 in architectural work! Please check out his site, Eyebeam Images!
Hello Marco,
Thanks for that interesting introduction to your methods. I use a similar camera/lens combination and a Manfrotto tripod for my interior shots, so was pleased to see details of someone else’s approach.
Where my set-up differs is that I use the Manfrotto 410 ‘Junior’ geared head. It takes a while to get used to but gives unrivalled precision in camera positioning. With Fuji’s artificial horizon switched on and viewing through the LCD, I can set the shot exactly how I’d like it to look.
Regards,
Roger
Hi Roger;
Thank you for the tip about the Manfrotto geared head. I’ll look into one of those.
My first job out of college was as a photo assistant for an architecture photographer. I had to carry a 4×5 or 8×10 Sinar P2 in the field. That camera was meant mostly for studio use and was extremely heavy! The weight was partly due to the fact it used geared movements. Like the geared tripod head you mentioned, it also provided fantastic precision when lining up the image.
Best regards, Marco
> Thank you for the tip about the Manfrotto geared head. I’ll look into one of those.
You’re welcome. I hope you like it.
All the best,
Roger
Hi Roger;
Went to a local photo store that had one of the Manfrotto geared heads on a demo tripod. Wow, very smooth and precise. I’m going to get one before the end of the year. Thanks again.
Best regards, Marco
Interesting article. Thanks for sharing. The Fuji camera’s and lenses do a very good Job indeed. There is one thing wrong in your writing though 😉
“The quick release levers at each section of the legs are fantastic to use on location. Much faster than threaded twist locks.” i bet i can beat you in speed with my twist lock tripod just because i can open all three sections with just a little turn of my hand at once. Locking the sections is about the same time.
Hi Elderin;
I never thought of unlocking all three sections of a twist lock tripod at once! Good technique, thanks for that.
Best regards, Marco
Hi,
thanks for the article, very interesting indeed. I’ve been looking for a wide lens to go with a Kipon t/s adapter and the 17mm you mentioned is the widest I’ve seen people use so far. Could you tell me which 17mm you are using?
BR,
Joonas
hi,
is it posible to post full res images(jpeg and raw) of xf 10-24 @10mm and @14mm at f-4-5.6-8 so that both focal length give the same view i.e you have to adjust you position.
Hi M,
This was a guest post, so I do not have the high res images or the lens. If you want, you can contact Marco directly at his site, which is:
https://eyebeamimages.wordpress.com/
He is a very nice guy, and I’m sure he wouldn’t mind helping you out. Thanks for stopping by!
Best regards,
Patrick